冷Vista风格的菜单
 {A}{S0}简介
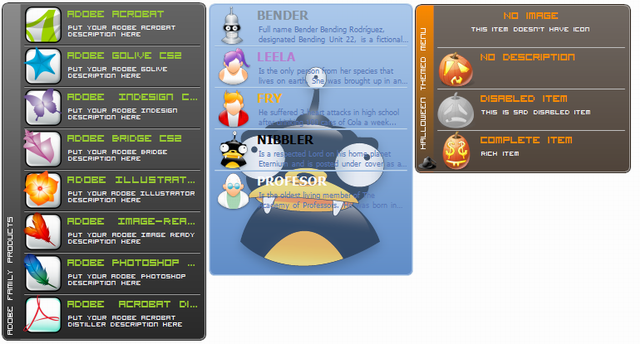
这是这种控制的第二个版本,所以我以前的文章是有点差,我也决定更新。我根据这在Vista开始菜单控制的发展,但正如你可以看到在上面的图片,它可以很容易地定制,以支持其他的样式,主题等更多细节应用主题(Mac风格的菜单,请参阅演示项目运行等)。使用代码
使用这种控制是非常容易的。只需将它添加到您的工具箱,然后拖动放大器;表单下降。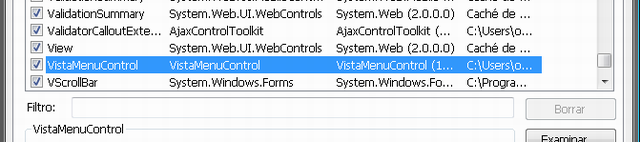
接下来,填充菜单控制,添加菜单项。有几个重载方法,你可以用它来实现这一:public VistaMenuItem Add(string sText);
public VistaMenuItem Add(string sText, string sDescription, Image img);
public VistaMenuItem Add(string sText, Image img);
public void Add(VistaMenuItem btn);
所以,如果你想丰富的菜单项,你应该使用第三种方法。下面是一个简单的代码添加一些项目: for(int idx = 0; idx < 5; idx++)
vmcMenu.MenuItems.Add(
"Item " + idx,
"Description " + idx,
img
);
下面的图像显示菜单控制的不同元素。菜单项丰富的渲染,这意味着,他们有一个形象的代表,标题来识别它们,和一个简短的描述。每个菜单项分隔符是有限的。它们可以是平面,三维,并在此版本的控制,还可以指定不使它们在所有。稍后将介绍此功能。随着菜单侧边栏,你可以组不同的菜单,使用不同的名字,和alsonbsp;提供了一个将呈现边栏标题旁的图标。{S3}
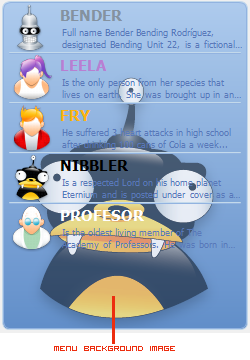
菜单面板呈现使用渐变颜色显示的图像
控制实现很多菜单的外观相关的属性,像开始和结束渐变的颜色,内/外边框的颜色,侧边栏的渐变颜色。public Color MenuStartColor public Color MenuEndColor public Color MenuInnerBorderColor public Color MenuOuterBorderColor public Color SideBarStartGradient public Color SideBarEndGradient
Vista的菜单控制也能够使背景图像。可以设置图像的对齐方式,由ContentAlignment枚举定义,然后DrawBackImage调用绘制图像。 private void DrawBackImage(
Graphics gfx,
Rectangle rc
)
{
if (m_bmpBackImage != null)
{
int lW = m_bmpBackImage.Width;
int lH = m_bmpBackImage.Height;
Rectangle rcImage = new Rectangle(
0,
0,
lW,
lH
);
switch (m_ImageAlign)
{
case ContentAlignment.BottomCenter:
rcImage.X = rc.Width / 2 - lW / 2;
rcImage.Y = rc.Height - lH - 2;
break;
case ContentAlignment.BottomLeft:
rcImage.X = rc.Left + 2;
rcImage.Y = rc.Height - lH - 2;
break;
case ContentAlignment.BottomRight:
rcImage.X = rc.Right - lW - 2;
rcImage.Y = rc.Height - lH - 2;
break;
case ContentAlignment.MiddleCenter:
rcImage.X = rc.Width / 2 - lW / 2;
rcImage.Y = rc.Height / 2 - lH / 2;
break;
case ContentAlignment.MiddleLeft:
rcImage.X = rc.Left + 2;
rcImage.Y = rc.Height / 2 - lH / 2;
break;
case ContentAlignment.MiddleRight:
rcImage.X = rc.Right - lW - 2;
rcImage.Y = rc.Height / 2 - lH / 2;
break;
case ContentAlignment.TopCenter:
rcImage.X = rc.Width / 2 - lW / 2;
rcImage.Y = rc.Top + 2;
break;
case ContentAlignment.TopLeft:
rcImage.X = rc.Left + 2;
rcImage.Y = rc.Top + 2;
break;
case ContentAlignment.TopRight:
rcImage.X = rc.Right - lW - 2;
rcImage.Y = rc.Top + 2;
break;
}
gfx.DrawImage(
m_bmpBackImage,
rcImage
);
}
}
 的实施{五}
DrawMenuItems是一个菜单控制的核心方法。private void DrawMenuItems(
Graphics gfx,
Rectangle rc,
float r
)
{
Rectangle rcItem = new Rectangle();
bool bVertical = (m_eMenuOrientation == VistaMenuOrientation.Vertical)
? true : false;
if (bVertical)
{
rcItem.X = 5;
rcItem.Y = 4;
rcItem.Width = rc.Width - 10;
rcItem.Height = m_lItemHeight;
}
else
{
rcItem.X = 5;
rcItem.Y = 4;
rcItem.Width = m_lItemWidth;
rcItem.Height = rc.Height - 7;
}
if (m_bDrawBar){
rcItem.X = m_lBarWidth;
rcItem.Width -= m_lBarWidth - 5;
}
Rectangle rcUpRect = rcItem;
Rectangle rcDownRect = rcItem;
rcUpRect.Height /= 2;
rcDownRect.Height /= 2;
rcDownRect.Y = rcUpRect.Height + 3;
if (items == null || items.Count == 0)
return;
gfx.SmoothingMode = SmoothingMode.HighQuality;
gfx.CompositingQuality = CompositingQuality.HighQuality;
gfx.TextRenderingHint = TextRenderingHint.ClearTypeGridFit;
foreach (VistaMenuItem item in items) {
#region Draw selection / checked state
try
{
item.Left = rcItem.X;
item.Top = rcItem.Y;
Rectangle rcItemInner = rcItem;
if (item.Checked)
{
if (item.Hovering)
{
FillMenuItem(
gfx,
rcUpRect,
rcDownRect,
item.CheckedStartColor,
item.CheckedEndColor,
item.CheckedStartColorStart,
item.CheckedEndColorEnd,
r
);
DrawItemBorder(
gfx,
rcItemInner,
item.MouseDown,
item.InnerBorder,
item.OuterBorder,
r
);
}
else
{
FillMenuItem(
gfx,
rcUpRect,
rcDownRect,
item.CheckedStartColor,
item.CheckedEndColor,
item.CheckedStartColorStart,
item.CheckedEndColorEnd,
r
);
DrawItemBorder(
gfx,
rcItemInner,
item.MouseDown,
item.InnerBorder,
item.OuterBorder,
r
);
}
}
else
{
if (item.Hovering)
{
if (!item.Disabled)
{
FillMenuItem(
gfx,
rcUpRect,
rcDownRect,
item.SelectionStartColor,
item.SelectionEndColor,
item.SelectionStartColorStart,
item.SelectionEndColorEnd,
r
);
DrawItemBorder(
gfx,
rcItemInner,
item.MouseDown,
item.InnerBorder,
item.OuterBorder,
r
);
}
}
}
}
catch (Exception e)
{
MessageBox.Show(
e.ToString()
);
}
#endregion
#region Draw icons
if (item.Image != null)
{
Rectangle rcIcon = new Rectangle();
rcIcon.X = rcItem.X + 2;
rcIcon.Y = rcItem.Bottom - item.Image.Height;
rcIcon.Width = item.Image.Width;
rcIcon.Height = item.Image.Height;
if (item.Disabled)
{
ControlPaint.DrawImageDisabled(
gfx,
item.Image,
rcIcon.X,
rcIcon.Y,
Color.Transparent);
}
else
{
gfx.DrawImage(
item.Image,
rcIcon
);
}
}
#endregion
#region Draw separators
if (m_bSeparators)
{
Point pStart = new Point();
Point pEnd = new Point();
if (bVertical)
{
pStart = new Point(rcItem.Left + 3, rcItem.Bottom);
pEnd = new Point(rcItem.Right - 3, rcItem.Bottom);
}
else
{
pStart = new Point(rcItem.Right, rcItem.Top);
pEnd = new Point(rcItem.Right, rcItem.Bottom);
}
using (Pen pInner = new Pen(m_clrInnerBorder),
pOuter = new Pen(m_clrOuterBorder))
{
if (!m_bFlatSeparators)
{
// don't draw separator for last item:
if (items.IndexOf(item) < items.Count - 1)
{
if (bVertical)
{
gfx.DrawLine(pOuter, pStart, pEnd);
pStart.Y += 1; pEnd.Y += 1;
gfx.DrawLine(pInner, pStart, pEnd);
}
else
{
gfx.DrawLine(pOuter, pStart, pEnd);
pStart.X += 1; pEnd.X += 1;
gfx.DrawLine(pInner, pStart, pEnd);
}
}
}
else
{
Pen pFlat = new Pen(m_clrFlatSeparators);
// don't draw separator for last item:
pStart.Y += 1; pEnd.Y += 1;
if (items.IndexOf(item) < items.Count - 1)
gfx.DrawLine(pFlat, pStart, pEnd);
// clean up:
pFlat.Dispose();
}
}
}
#endregion
#region Draw item's text
StringFormat sf = new StringFormat();
StringFormat sfUpper = new StringFormat();
sfUpper.Trimming = StringTrimming.EllipsisCharacter;
sfUpper.FormatFlags = StringFormatFlags.LineLimit;
sf.Trimming = StringTrimming.EllipsisCharacter;
sf.FormatFlags = StringFormatFlags.LineLimit;
Rectangle rcCaption = rcUpRect;
Rectangle rcContent = rcDownRect;
if (item.Image != null)
{
sfUpper.Alignment = StringAlignment.Near;
sfUpper.LineAlignment = StringAlignment.Near;
sfUpper.LineAlignment = StringAlignment.Center;
sf.Alignment = StringAlignment.Near;
Rectangle rcImage = new Rectangle(
rcItem.X + 2,
rcItem.Y,
item.Image.Width,
item.Image.Height);
rcCaption.X = rcImage.Right + 2;
rcContent.X = rcImage.Right + 4;
rcCaption.Width -= rcImage.Width;
rcContent.Width -= rcImage.Width + 4;
}
else
{
sfUpper.Alignment = StringAlignment.Center;
sfUpper.LineAlignment = StringAlignment.Near;
sfUpper.LineAlignment = StringAlignment.Center;
sf.Alignment = StringAlignment.Center;
}
// draw text for item's caption / description:
SolidBrush sbCaption = new SolidBrush(Color.Empty);
SolidBrush sbContent = new SolidBrush(Color.Empty);
if (item.Checked)
{
sbCaption.Color = item.CheckedCaptionColor;
sbContent.Color = item.CheckedContentColor;
}
else
{
sbCaption.Color = item.CaptionColor;
sbContent.Color = item.ContentColor;
}
gfx.DrawString(item.Text, item.CaptionFont, sbCaption,
rcCaption, sfUpper);
gfx.DrawString(item.Description, item.ContentFont,
sbContent, rcContent, sf);
sfUpper.Dispose();
sf.Dispose();
sbCaption.Dispose();
sbCaption.Dispose();
#endregion
#region Update positions
if (bVertical)
{
rcUpRect.Y += rcItem.Height + 2;
rcDownRect.Y += rcItem.Height + 2;
rcItem.Y += rcItem.Height + 2;
}
else
{
rcUpRect.X += rcItem.Width + 2;
rcDownRect.X += rcItem.Width + 2;
rcItem.X += rcItem.Width + 2;
}
#endregion
}
}
控制菜单项的渲染过程中,根据项目的状态(禁用,徘徊,检查)。此外,它指定项目的标题,描述,形象和分离器是根据菜单的方向呈现。
每个菜单项代表VistaMenuItem类。在类图中所示,有数量庞大的属性来定制项目的外观。 VistaMenuItems是从CollectionBase扩展一个类,它持有的所有菜单项,并控制添加/删除。这样,我们可以很容易地执行HitTest的运作,在搜索时徘徊的项目,或探测目标菜单项鼠标点击。
其他重要的方法,菜单的功能HitTestItem,CalcMenuSize。 private int HitTestItem(
int x,
int y
)
{
int code = -1;
VistaMenuItem item = null;
if ((x > m_lBarWidth) && (x <= this.ClientRectangle.Width))
{
if ((y >= 2) && (y <= this.ClientRectangle.Height))
{
for (int idx = 0; idx < items.Count; idx++)
{
item = items[idx];
if (y >= item.Top)
{
if (y < item.Top + m_lItemHeight)
{
code = idx;
break;
}
}
}
}
}
if (code == -1)
{
// cursor inside side bar:
for (int i = 0; i < items.Count; i++)
{
// unhover any hovering item:
items[i].Hovering = false;
Cursor = Cursors.Default;
Invalidate();
}
}
return code;
}
public void CalcMenuSize()
{
if (!this.DesignMode){
int lHeight = (items.Count ) * (m_lItemHeight + 3 ) + 1 ;
int lWidth = (items.Count) * (m_lItemWidth + 4) + 1;
if (m_eMenuOrientation == VistaMenuOrientation.Vertical)
{
this.MaximumSize = new Size(this.Width, lHeight);
this.Size = new Size(this.Width, lHeight);
}
else
{
this.MinimumSize = new Size(this.m_lItemWidth, this.m_lItemHeight);
this.MaximumSize = new Size(lWidth, this.m_lItemHeight + 5);
this.Size = new Size(lWidth, this.m_lItemHeight + 5);
}
Invalidate();
}
}
}
其中的第一个是用来寻找一个项目时thenbsp;侧边栏呈现徘徊。它首先检查如果鼠标在菜单区域内,不包括侧栏矩形的宽度。如果条件计算为真,那么我们遍历项目的集合,并找到正确的项目指标。第二个动态调整菜单的高度或宽度,根据菜单的方向。新功能{中六}
在本次更新的新的很酷的功能之一就是显示菜单的能力水平。此功能是控制MenuOrientation财产。我发现这个功能特别有趣的使用在主应用程序的窗口,在这里您可以介绍您的应用程序的部分。例如,Nero StartSmart的基础。请注意,水平显示菜单时,侧边栏不能被渲染。
另一个有用的功能,实施,检查的状态。检查项目时,您可以指定项目的渐变颜色,标题/描述字体颜色。要激活此功能,你应该设置为true CheckOnClick功能。{七}
您可以通过编程方式获取/选择菜单项使用SelectedItem属性。public int SelectedItem
{
get
{
int idx = -1;
for (int i = 0; i < items.Count; i++) {
if (items[i].Checked)
idx = items.IndexOf(items[i]);
}
return idx;
}
set
{
if (value < 0 || value > items.Count)
return;
for (int i = 0; i < items.Count; i++){
if (items[value].Disabled)
return;
items[value].Checked = true;
}
Invalidate();
}
}
本新闻稿中提供的最后一个功能是禁用分离器渲染的可能性。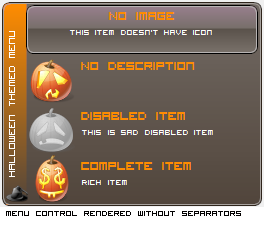 示范项目
示范项目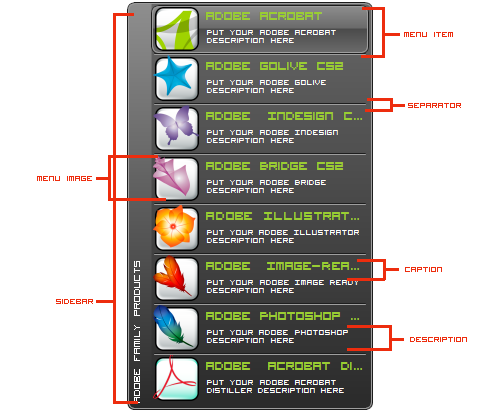
请确保您游客TT2 BRK字体复制到您的字体文件夹,运行示例项目之前,。历史2008年11月7日:初始版本
第21届年11月,2008年:重绘问题固定11月,25日2008年:添加了新功能2008年12月28日:第二版