WPFWindowFinder工具
 {A}简介
{A}简介
窗口Finder是一个简单的WPF应用程序,显示本届会议的所有可见的顶部级别的Windows。它可以是非常有用的取回访问窗口了关闭屏幕,如后,你有脱开你的笔记本电脑。而被关闭屏幕不是顶级窗口的真正的问题 - 你仍然可以使用移动任务栏的上下文菜单 - 它可以为弹出窗口,不会出现在任务栏中,尤其是如果应用程序记住的位置坚持绘制的可见区域之外,即使重新启动。有了这个小工具,您可以拖动任何窗口可见区域。
这个工具的功能是不是一个大的事情,但它很好地显示在一个简明的项目一些WPF的技术和简单的事情,有一个简单的实现与WPF是多么容易,所以我决定在这里发布。从这篇文章,我能得到什么?
这里所涉及的WPF技术:MVVM的设计使用Canvas的一个ItemsControl中的项目面板使用Viewbox的分离查看和ViewModel的坐标里面的一个Viewbox的拖动项目使用代码
我所有的WPF的应用程序一样,我建立了这个小应用程序使用MVVM设计。即使这种简单的应用程序,它支付使用它,因为它确实有助于保持一切简单而明确的。
显示项目所需的所有信息,需要只有两个视图模型:一个代表每一个窗口和一个控股收集所有Windows。在视图模式中使用的坐标是原生窗口的坐标;我们不需要任何在视图模式查看相关翻译。
WindowItemViewModel代表每个窗口,刚刚处理,文字,工艺和矩形的属性。这是我们需要一个窗口显示的占位符。它实现INotifyPropertyChanged所以窗口将按照真正的窗口位置,当我们改变它。您可能会注意到,如文本或过程的属性没有缓冲,但每次属性的getter调用时将得到评估。这是设计用于具有约束力的性质确定,因为约束力无论如何调用getter只有一次,所以缓冲将是不必要的开销。如果评估的财产,原来是缓慢的,你可以只作出具有约束力的异步加快显示,这是行不通的,如果你有在构造评价饲料与价值的财产。/// <summary>
/// Item view model for one item in the window list.
/// All coordinates are native window coordinates, it's up to the view
/// to translate this properly.
/// </summary>
[SecurityPermission(SecurityAction.LinkDemand)]
public class WindowItemViewModel : INotifyPropertyChanged
{
/// <summary>
/// Create a new object for the window with the given handle.
/// </summary>
/// <param name="handle">The handle of the window.</param>
public WindowItemViewModel(IntPtr handle)
{
this.Handle = handle;
}
/// <summary>
/// The handle of this window.
/// </summary>
public IntPtr Handle
{
get;
private set;
}
/// <summary>
/// The window text of this window.
/// </summary>
public string Text
{
get
{
StringBuilder stringBuilder = new StringBuilder(256);
NativeMethods.GetWindowText(Handle, stringBuilder, stringBuilder.Capacity);
return stringBuilder.ToString();
}
}
/// <summary>
/// The process image file path.
/// </summary>
public string Process
{
get
{
IntPtr processIdPtr = Marshal.AllocCoTaskMem(Marshal.SizeOf(typeof(int)));
NativeMethods.GetWindowThreadProcessId(Handle, processIdPtr);
int processId = (int)Marshal.PtrToStructure(processIdPtr, typeof(int));
IntPtr hProcess = NativeMethods.OpenProcess
(NativeMethods.PROCESS_ALL_ACCESS, false, processId);
var stringBuilder = new StringBuilder(256);
NativeMethods.GetProcessImageFileName
(hProcess, stringBuilder, stringBuilder.Capacity);
NativeMethods.CloseHandle(hProcess);
Marshal.FreeCoTaskMem(processIdPtr);
return stringBuilder.ToString();
}
}
/// <summary>
/// The windows rectangle.
/// </summary>
public Rect Rect
{
get
{
NativeMethods.Rect nativeRect;
NativeMethods.GetWindowRect(Handle, out nativeRect);
Rect windowRect = new Rect(nativeRect.TopLeft(), nativeRect.BottomRight());
return windowRect;
}
set
{
NativeMethods.SetWindowPos(Handle, IntPtr.Zero,
(int)(value.Left),
(int)(value.Top),
0, 0, NativeMethods.SWP_NOACTIVATE |
NativeMethods.SWP_NOSIZE | NativeMethods.SWP_NOZORDER);
ReportPropertyChanged("Rect");
}
}
#region INotifyPropertyChanged Members
private void ReportPropertyChanged(string propertyName)
{
if (PropertyChanged != null)
{
PropertyChanged(this, new PropertyChangedEventArgs(propertyName));
}
}
public event PropertyChangedEventHandler PropertyChanged;
#endregion
}
TopLevelWindowsViewModel提供了一个窗口列表显示,再加上所有窗口的边界矩形设置适当的滚动。从DependencyObject派生的,所以我们可以只使用依赖项属性。代码依赖属性来看,似乎引进了大量的打字工作,但如果你使用的"; propdpquot代码片段,它原来是比较容易处理,而不是一个简单的属性与INotifyPropertyChanged的 - 安全得多!只有quot; writtenquot;这里的代码Refresh方法,简单地列举了所有的窗户,创建项目视图模型列表和计算的范围。{C}
现在该视图模型成立,我们可以开始设计的看法:<UserControl x:Class="WindowFinder.TopLevelWindowsView"
xmlns="http://schemas.microsoft.com/winfx/2006/xaml/presentation"
xmlns:x="http://schemas.microsoft.com/winfx/2006/xaml"
xmlns:src="clr-namespace:WindowFinder"
xmlns:sys="clr-namespace:System;assembly=mscorlib"
Background="AliceBlue"
>
<UserControl.DataContext>
<src:TopLevelWindowsViewModel/>
</UserControl.DataContext>
<DockPanel>
<Grid DockPanel.Dock="Bottom">
<Slider x:Name="zoom" Margin="15,5" HorizontalAlignment="Right"
Width="200" Minimum="0.1" Maximum="2" Value="1"/>
</Grid>
<ScrollViewer HorizontalScrollBarVisibility="Auto"
VerticalScrollBarVisibility="Auto">
<Viewbox Width="{Binding TotalWidth}" Height="{Binding TotalHeight}">
<Viewbox.LayoutTransform>
<ScaleTransform ScaleX="{Binding Value, ElementName=zoom}"
ScaleY="{Binding Value, ElementName=zoom}"/>
</Viewbox.LayoutTransform>
<ItemsControl ItemsSource="{Binding TopLevelWindows}"
Width="{Binding TotalWidth}" Height="{Binding TotalHeight}"
Margin="{Binding TotalMargin}">
<ItemsControl.ItemContainerStyle>
<Style TargetType="ContentPresenter">
<Setter Property="Canvas.Left" Value="{Binding Rect.Left}"/>
<Setter Property="Canvas.Top" Value="{Binding Rect.Top}"/>
</Style>
</ItemsControl.ItemContainerStyle>
<ItemsControl.ItemTemplate>
<DataTemplate>
<Border SnapsToDevicePixels="True" Width="{Binding Rect.Width}"
Height="{Binding Rect.Height}"
Background="{x:Null}" BorderThickness="1" BorderBrush="Blue"
CornerRadius="2" MinHeight="10" MinWidth="50"
ToolTip="{Binding Process}" >
<TextBlock HorizontalAlignment="Stretch" VerticalAlignment="Top"
Background="Blue" Foreground="White"
Text="{Binding Text}" FontSize="8"
MouseLeftButtonDown="caption_MouseLeftButtonDown"/>
</Border>
</DataTemplate>
</ItemsControl.ItemTemplate>
<ItemsControl.ItemsPanel>
<ItemsPanelTemplate>
<Canvas/>
</ItemsPanelTemplate>
</ItemsControl.ItemsPanel>
</ItemsControl>
</Viewbox>
</ScrollViewer>
</DockPanel>
</UserControl>
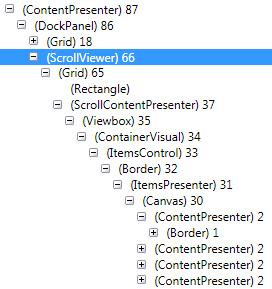
由于我们使用MVVM模式,控制的数据上下文TopLevelWindowsViewModel。我们要显示的项目清单,让我们使用一个ItemsControl ItemsSource属性绑定到视图模型TopLevelWindows属性。我们要明确项目的位置,所以我们用一个Canvas作为项目控制的ItemsPanel。可视化每个窗口,我们简单地画一个边框和顶部对齐文本块,这样的ItemTemplate中是如何做的。每个项目的数据上下文将是一个WindowItemViewModel,所以我们可以绑定到其属性。边框的宽度和高度只需绑定到窗口矩形的宽度和高度,但是,如果你看一下在XAML中,您将无法找到在边界水平Canvas.Left和Canvas.Top约束力。为什么会没有工作,你可以看到,如果你看一下在可视化树,如使用探听:{S0}
边界,这是该项目模板的根元素,是不是一个Canvas的直接子。 ItemsControl中创建一个ContentPresenters其中包含的项目,我们设计了列表。这似乎是一个问题的ContentPresenter是不是我们的XAML中的一部分,但实现的项目时,由ItemsControl的产生,所以它不是我们的直接控制之下。我们可以开始编写代码背后泡了可视化树和发现的ContentPresenter或写一个ItemsContainerGenerator,但有一个更简单的解决方案 - 只使用的ItemContainerStyle访问的ContentPresenter的属性,你可以看到在上面的XAML。
现在,我们可以显示我们所有的窗口在项目主持人,但是这将是一个一对一的映射屏幕(视图模型中,我们使用本地窗口坐标),这是不是最好得到一个概述,所以我们希望缩减一切。一个Viewbox的不正是我们所需要的。我们只需要照顾,我们不要乱滚动,所以我们需要保持Viewbox的ItemsControl的相同的长宽比。我们可以使用一个转换器在绑定规模值,但是这会使一个动态调整硬盘,如果不是不可能的。最简单的方式来解决在XAML中,而无需编写额外的代码是简单地绑定本机的宽度和高度的Viewbox的,然后只是规模的整体观中使用布局改造。
最后一步是添加一个简单的拖动处理程序,以支持拖动丢失的Windows可见区域。只是拖动项目是一个简单的任务;记得鼠标按下事件最初的鼠标位置和措施,在每个鼠标移动事件的距离。由于拖着适用于对视图模型和视图模型是使用原生窗口坐标,一切都证明,以配合完美。/// <summary>
/// Interaction logic for TopLevelWindowsView.xaml
/// </summary>
public partial class TopLevelWindowsView : UserControl
{
public TopLevelWindowsView()
{
InitializeComponent();
Application.Current.MainWindow.Activated += MainWindow_Activated;
}
/// <summary>
/// The associated view model.
/// </summary>
private TopLevelWindowsViewModel ViewModel
{
get
{
return DataContext as TopLevelWindowsViewModel;
}
}
private void MainWindow_Activated(object sender, EventArgs e)
{
// Refresh the view every time the main window is activated -
// other windows positions might have changed.
ViewModel.Refresh();
}
protected override void OnKeyDown(KeyEventArgs e)
{
base.OnKeyDown(e);
// Provide a keyboard shortcut to manually refresh the view.
if (e.Key == Key.F5)
{
ViewModel.Refresh();
}
}
#region Simple drag handler
private Point dragStartMousePos;
private Rect dragWindowRect;
private void caption_MouseLeftButtonDown(object sender, MouseButtonEventArgs e)
{
FrameworkElement caption = (FrameworkElement)sender;
WindowItemViewModel window = (WindowItemViewModel)caption.DataContext;
if (window.Handle == this.GetHandle())
{
// Moving our own window would cause strange flickering, don't allow this.
return;
}
// Capture the mouse and connect to the elements mouse move & button up events.
caption.CaptureMouse();
caption.MouseLeftButtonUp += caption_MouseLeftButtonUp;
caption.MouseMove += caption_MouseMove;
// Remember the current mouse position and window rectangle.
this.dragStartMousePos = e.GetPosition(caption);
this.dragWindowRect = window.Rect;
}
private void caption_MouseLeftButtonUp(object sender, MouseButtonEventArgs e)
{
FrameworkElement caption = (FrameworkElement)sender;
// Stop dragging - release capture, disconnect events and refresh the view.
caption.ReleaseMouseCapture();
caption.MouseLeftButtonUp -= caption_MouseLeftButtonUp;
caption.MouseMove -= caption_MouseMove;
ViewModel.Refresh();
}
private void caption_MouseMove(object sender, MouseEventArgs e)
{
FrameworkElement caption = (FrameworkElement)sender;
// Move the dragged window:
Point mousePos = e.GetPosition(caption);
Vector delta = mousePos - this.dragStartMousePos;
dragWindowRect.Offset(delta);
// Apply changes to view model.
WindowItemViewModel window = (WindowItemViewModel)caption.DataContext;
window.Rect = dragWindowRect;
}
#endregion
}
这是所有编码。只需将其插入到主窗口和应用程序已准备就绪 - 你永远需要再次遭受损失的弹出窗口。历史2010/04/20 V 1.0
 。非常感谢您